What is the principle of Electrical Discharge Machining (EDM)

We know that traditional machining methods like turning, milling, grinding, and drilling all involve tools that are harder than the workpiece. The essence of these processes is using a harder material to cut a softer one, somewhat like using a knife to cut vegetables or peel fruit.
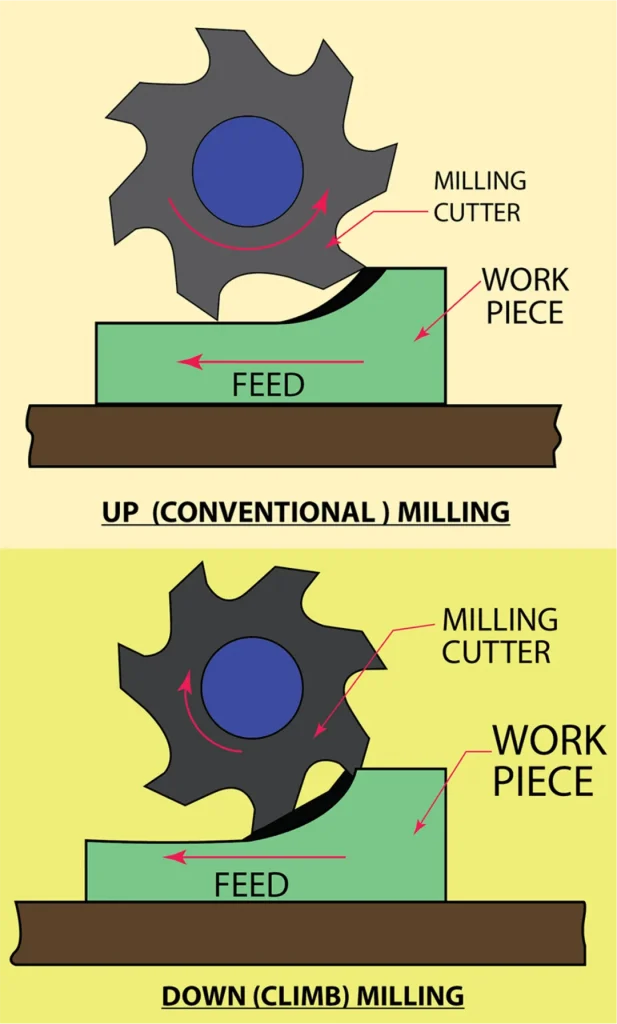
Milling Machining
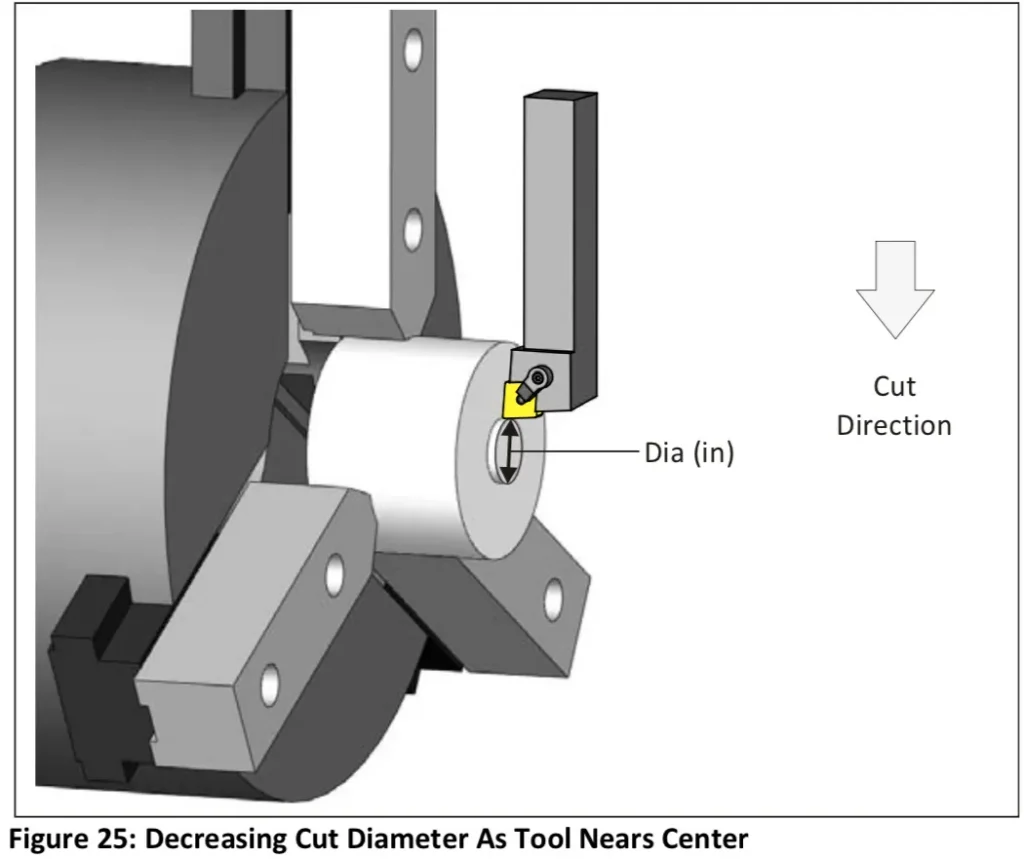
Turning Machining

However, Electrical Discharge Machining (EDM) is different. It can use softer tools, such as copper, to cut harder parts, like tool steel or carbide.

So, what is the principle of EDM, and why can soft tools machine hard materials? Let’s take a look at a diagram.
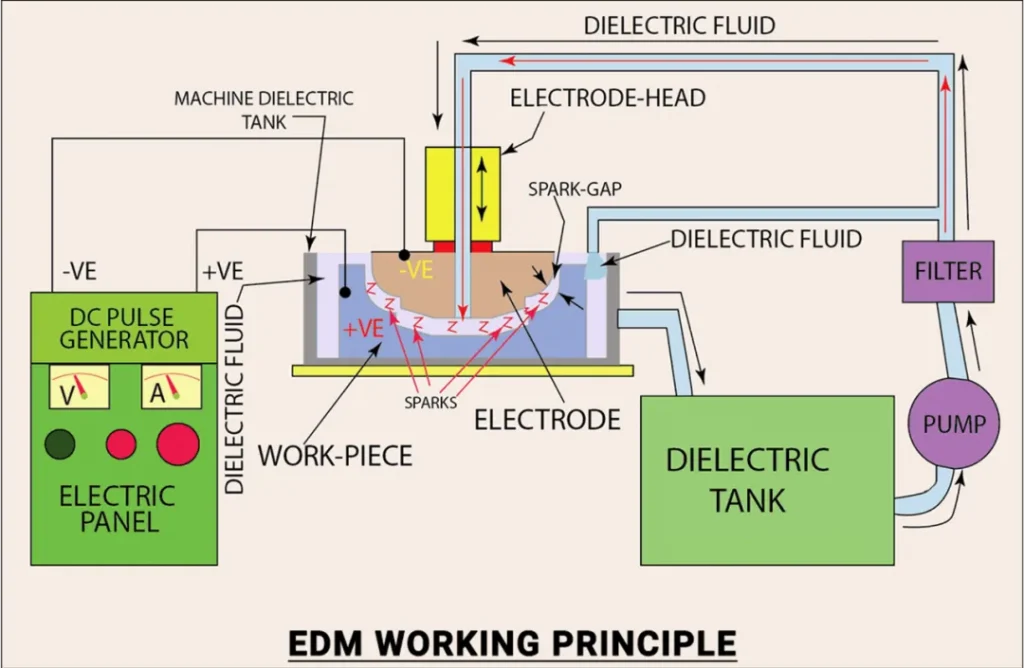
Diagram of the Principle of Electrical Discharge Machining (EDM)

In EDM, the tool does not physically contact the workpiece, meaning there is no interaction force as seen in traditional machining. As shown in the diagram, the tool serves as the electrode, and there is a gap between the tool and the workpiece, called the spark gap.

This gap is typically between 0.005 mm and 0.3 mm, and can sometimes reach up to 0.5 mm or even larger. Typically, the tool acts as the cathode, connected to the negative terminal of a DC pulse power supply, while the workpiece acts as the anode, connected to the positive terminal of the pulse power supply. The gap between the tool and the workpiece is filled with dielectric fluid.

When the tool approaches the workpiece, sparks are generated between the gap, producing extremely high electrical heat—up to 8,000–12,000°C—which melts and vaporizes part of the material on the workpiece surface. Thus, EDM is essentially a type of electrothermal erosion process.

On a microscopic level, the material that is melted is washed away by the dielectric fluid.
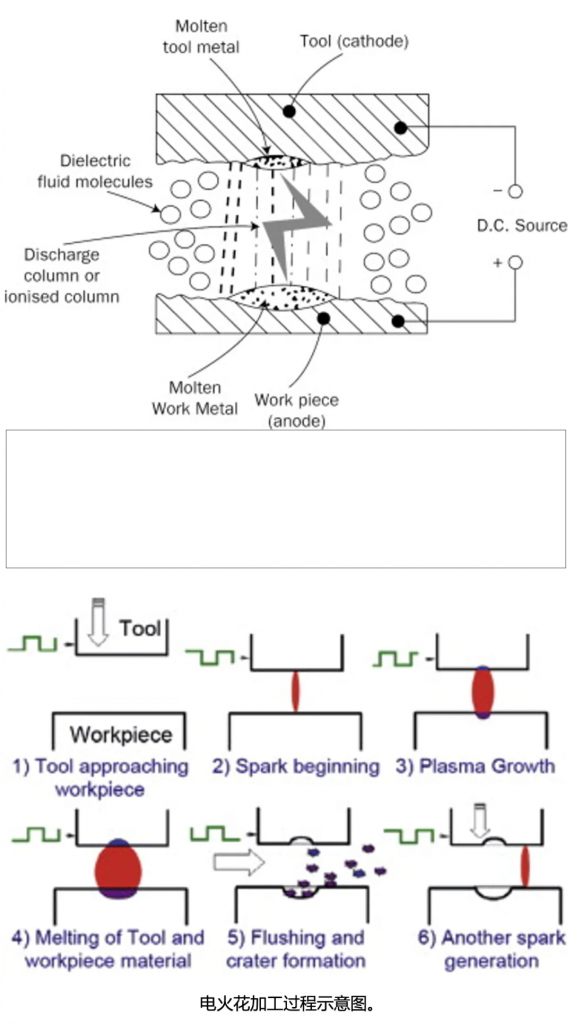
Principle of Electrical Discharge Machining (EDM)

Here, there are a few points that need clarification:

  1. How are sparks generated in EDM?
    As the electrode approaches the workpiece, the electric field strength in the spark gap region exceeds the dielectric strength of the fluid at a certain point, causing the fluid to break down and become conductive. This allows the current to flow from the electrode (tool) to the workpiece in the form of sparks.
  2. What is dielectric strength, and what is breakdown?
    Materials can be classified as conductors, insulators, and semiconductors. Conductors allow electricity to pass through because they have many freely moving charged particles (carriers) that form a current when an external voltage (electric field) is applied. Insulators do not conduct electricity under normal conditions because their charge carriers cannot move freely. However, when the external electric field is strong enough, the insulator’s charge carriers become mobile, turning it into a conductor. Dielectric strength is the maximum voltage that an insulating material can withstand before it breaks down and becomes conductive.
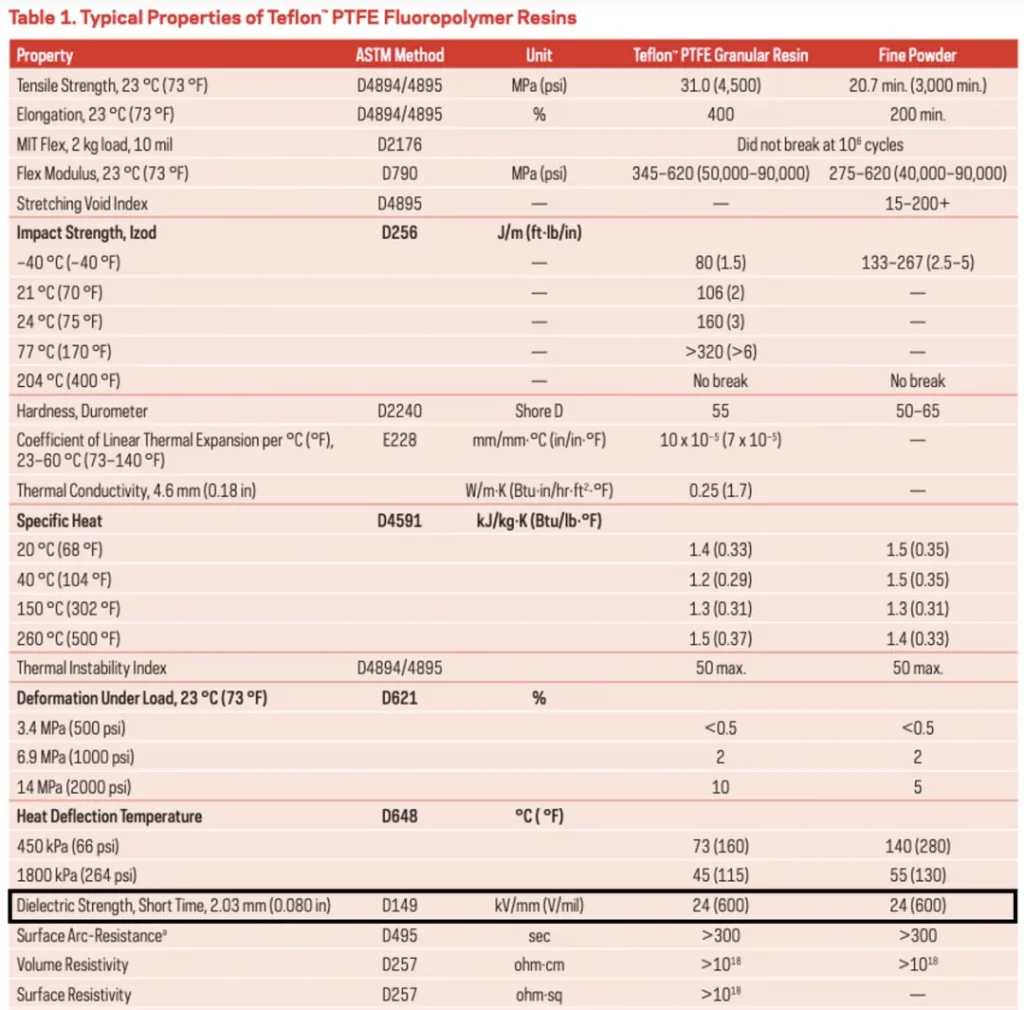
Teflon has a dielectric strength of 24 kV/mm, which means it can withstand up to 24 kV per millimeter before becoming conductive.

Once this threshold is exceeded, the insulator breaks down and conducts electricity. In EDM, when the pulse is applied, the dielectric fluid is broken down and becomes conductive, allowing the current to flow and be released as a spark. When the pulse stops, the dielectric fluid returns to its insulating state.

3. Why is high-frequency current needed?
High-frequency pulses are used because they provide brief on-times, which ensures the heat generated by the spark is insufficient to transfer deep into the tool or workpiece, thus protecting them. During the off-time, the dielectric fluid helps flush away the eroded material and replenishes the spark gap. This process happens very rapidly, with thousands or even tens of thousands of sparks occurring every second.

4. What are the common types of EDM?
The three main types are: Wire EDM, EDM drilling, and EDM sinking (molding).
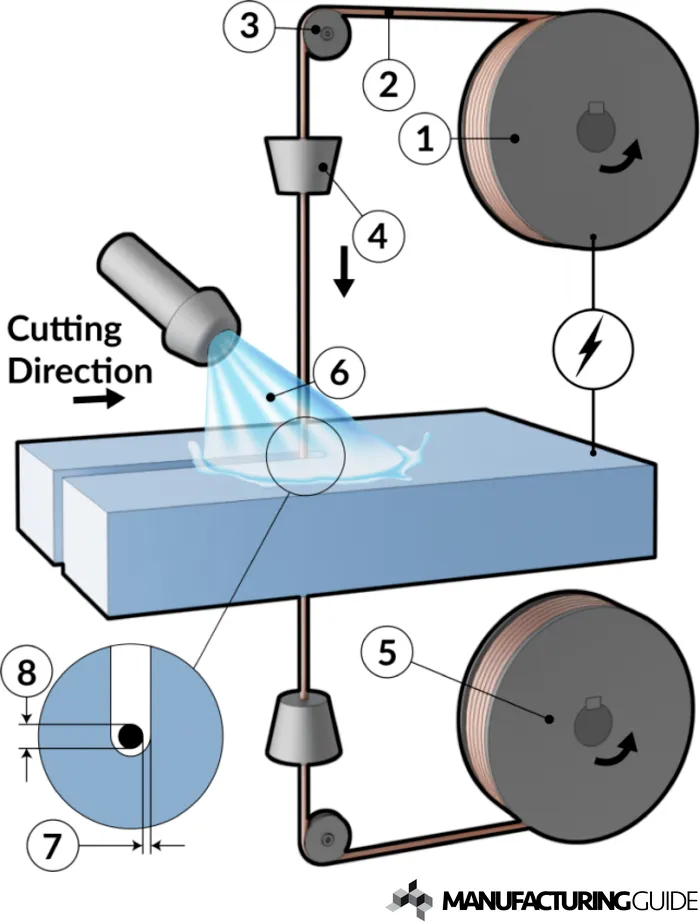
Wire EDM Principle: The fine wire in the wire EDM machine (made of brass, zinc-plated brass, or tungsten, with a diameter of 0.18 mm or 0.25 mm) acts as the electrode, while deionized water is used as the dielectric fluid (to make it insulating).
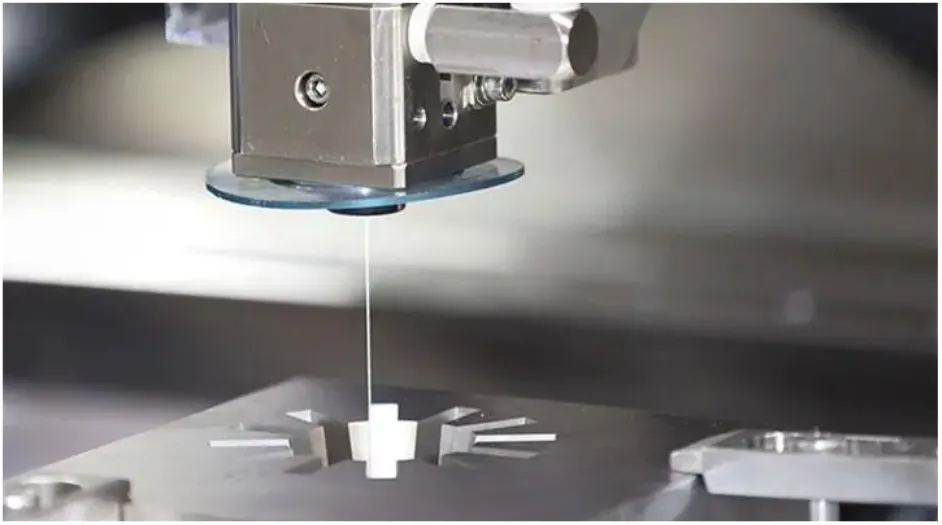
Diagram of Parts Processed by Wire EDM
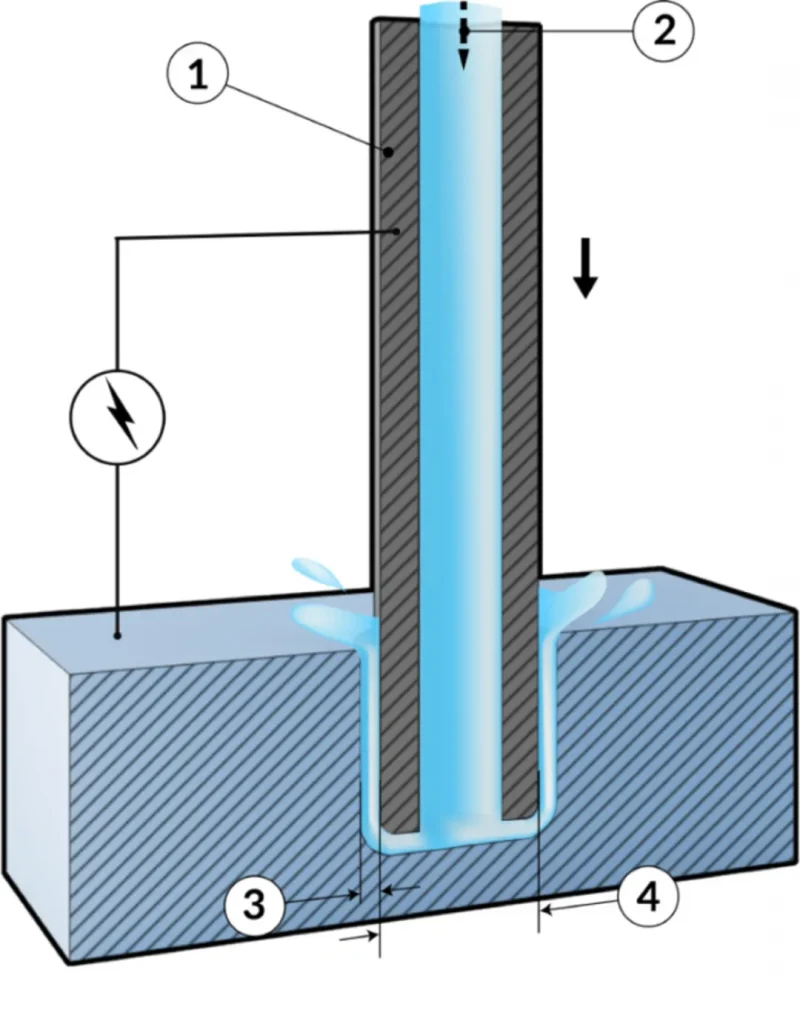
EDM Drilling Principle: A narrow nozzle near the workpiece creates intermittent sparks that melt and vaporize the material. The dielectric fluid, delivered through the nozzle, cools the process and helps flush away the material. The spark gap ensures that the hole’s diameter is slightly larger than the nozzle’s diameter.
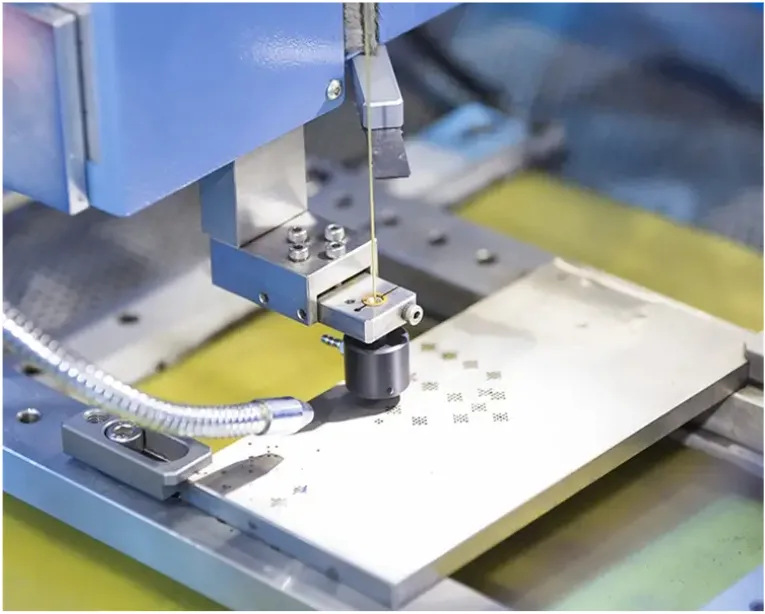
EDM Molding (Sinking): In EDM sinking, electrodes made from materials like copper, brass, graphite, tungsten, copper-tungsten, or carbide are used. This process is suitable for creating complex parts with high precision.
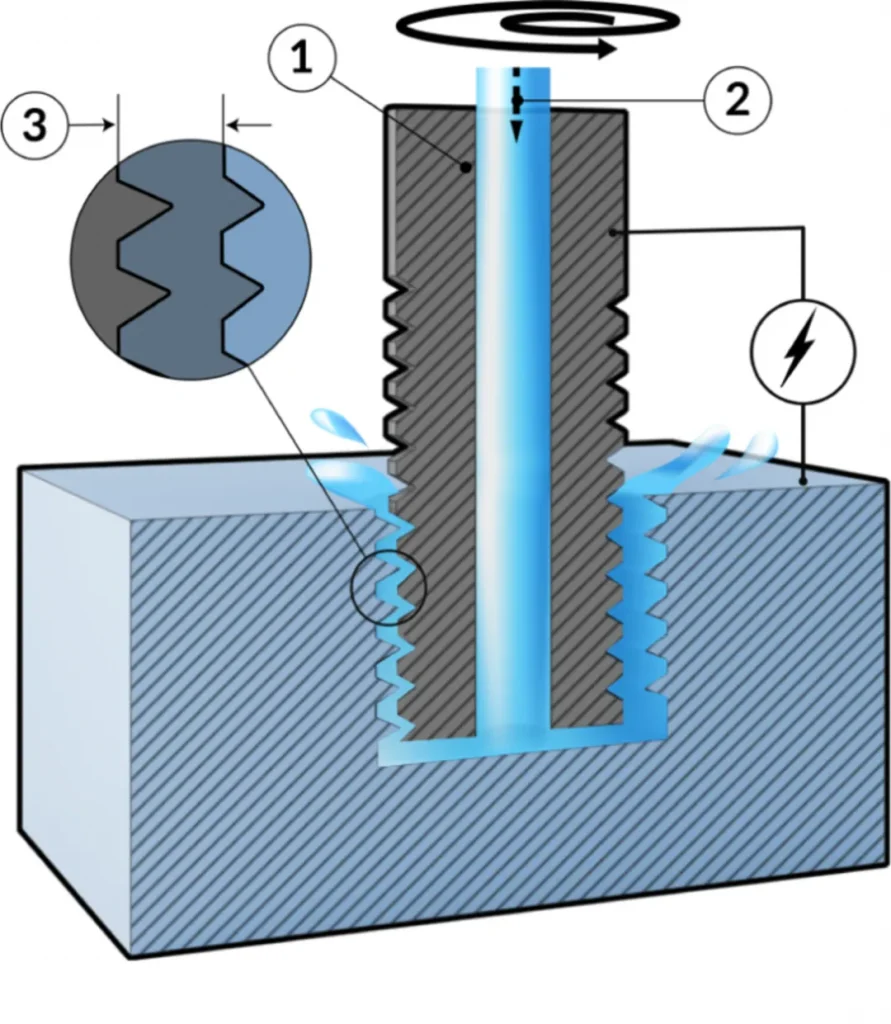
EDM Threaded Hole Machining
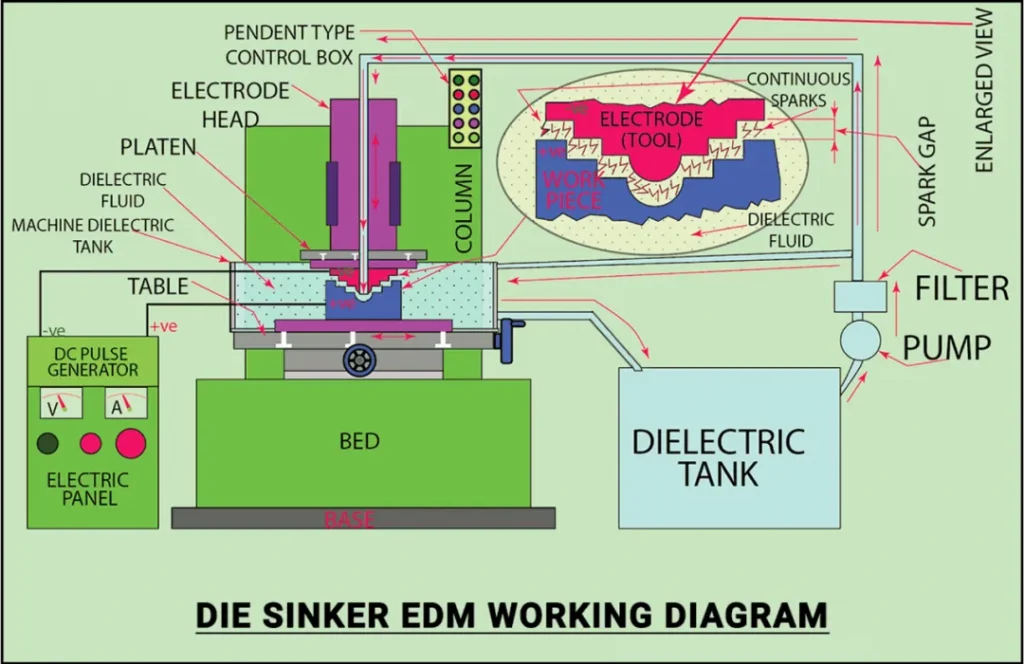
Diagram of the principle of EDM Molding (Sinking). To minimize electrode wear and maintain good surface finish quality, electrodes are typically made from materials such as copper, brass, graphite, tungsten, copper-tungsten, carbide, or copper-graphite.
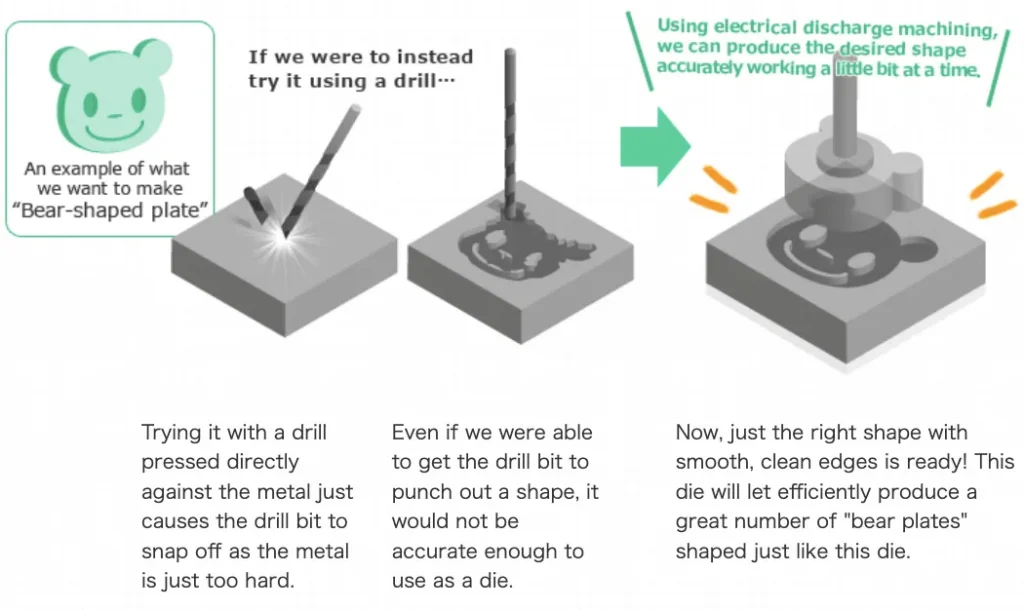
EDM Molding (Sinking): Copper or graphite can be used as electrodes, with specially designed tool shapes to machine complex parts. The left image shows a drill bit breaking due to the metal being too hard. The middle image shows insufficient precision, making the part unsuitable as a mold. The right image illustrates the use of EDM molding, where the desired high-precision mold is achieved in a single operation.

5. What materials can EDM machine?
EDM can theoretically be used on any conductive material. However, since the material removal rate is slower compared to traditional methods, EDM is best suited for machining hardened tool steels, titanium, carbide, tungsten carbide, chrome-nickel alloys, and other materials that are difficult to machine with conventional methods.
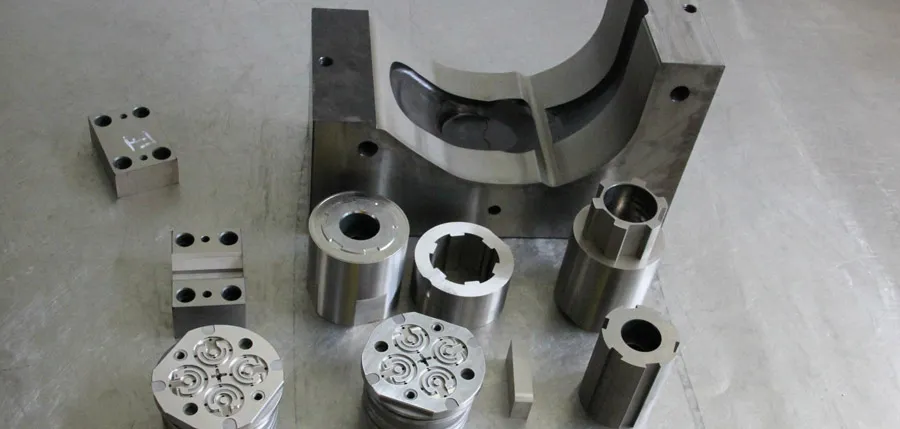
Electrical Discharge Machining (EDM) Parts

6. What is the accuracy of EDM?
EDM offers high precision. For example, wire EDM can achieve a precision of ±2.5 µm, with surface roughness as fine as 0.15–0.2 µRa. EDM sinking can achieve accuracy of ±0.05 mm to ±0.004 mm, and the surface finish on CNC machines can reach 0.29 µRa, with small machines achieving even finer finishes of 0.8 µRa.

7. What are the advantages and disadvantages of EDM?

Advantages:

  • Wide material compatibility: It can machine any conductive material, regardless of its toughness, hardness, or microstructure.
  • Suitable for hard materials: EDM can machine very hard conductive materials that are difficult to process using conventional methods.
  • No deformation: There is no physical contact between the tool and the workpiece, so no cutting force is applied, avoiding material deformation.
  • Capable of machining complex contours: Through molding EDM, precise contours can be replicated on the workpiece surface.
  • High precision: EDM offers excellent surface finish and tolerance control.
  • No burrs or tool marks: EDM does not leave burrs or tool marks on the workpiece surface.

Disadvantages:

  • Not suitable for non-conductive materials.
  • Slow material removal rate: The material removal rate is much slower compared to traditional machining processes, which can increase manufacturing time and overall costs.
  • Higher cost: EDM machines require significant power consumption, making the process more expensive than conventional milling or turning.
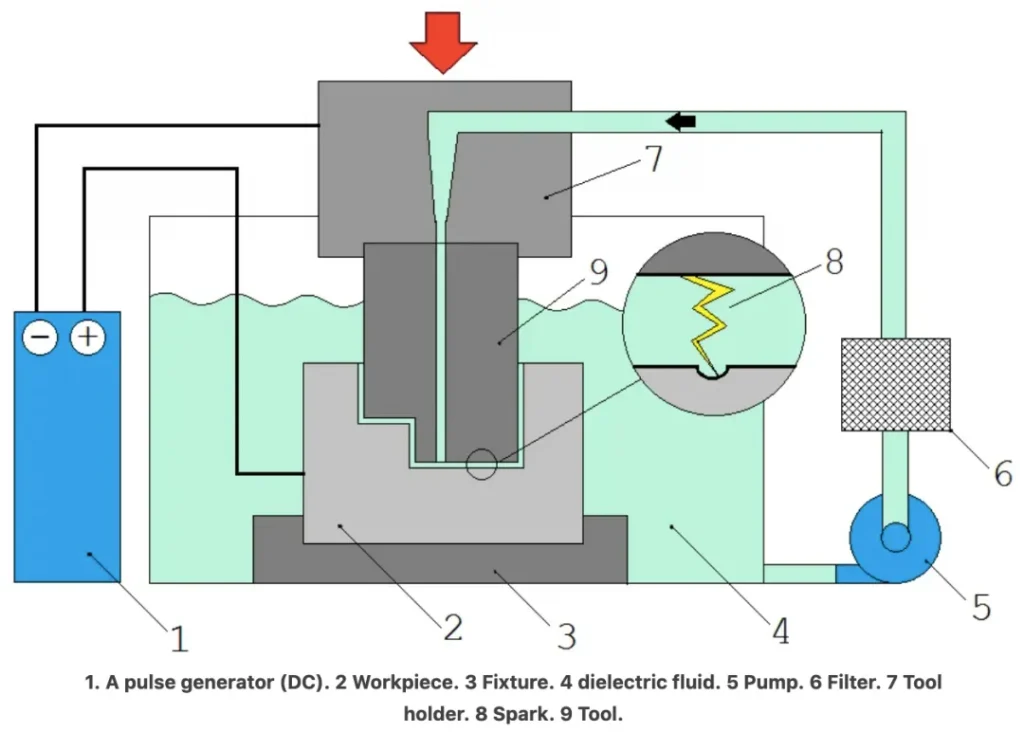
Diagram of the Electrical Discharge Machining (EDM) System

Since EDM directly uses electrical and thermal energy to remove metal, it is largely independent of the strength and hardness of the material being machined, allowing for soft tool electrodes to machine hard workpieces, effectively achieving “soft tools cutting hard materials.”
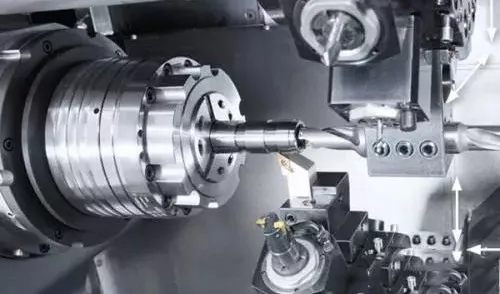
Common CNC Machining Issues: Do You Know How to Solve Them?


1. Overcutting of the Workpiece:

Causes:

  1. Tool deflection,The tool lacks sufficient strength or is too long or small, causing deflection.
  2. Operator error.
  3. Uneven cutting allowance (e.g., 0.5 mm left on the side of a curved surface, but only 0.15 mm left on the bottom).
  4. Improper cutting parameters (e.g., large tolerance, excessively fast SF setting).

Improvements:

  1. Tool selection principle: Use a larger, shorter tool when possible.
  2. Add a corner cleaning program and keep the allowance as even as possible (ensure the side and bottom allowances are the same).
  3. Adjust cutting parameters reasonably and round sharp corners in large allowance areas.
  4. Utilize the machine’s SF function and allow the operator to fine-tune the speed for optimal cutting performance.

2. Coordinate System Alignment Issues:

Causes:

  1. Inaccurate manual operation by the operator.
  2. Burrs around the mold.
  3. Magnetic centering rod.
  4. Mold sides are not perpendicular.

Improvements:

  1. Manual operation should be repeatedly checked, and centering should be done at the same point and height.
  2. Use a whetstone or file to remove burrs around the mold, wipe clean with cloth, and confirm by hand.
  3. Demagnetize the centering rod before use (ceramic centering rods or other alternatives can also be used).
  4. Check if the mold sides are perpendicular with a dial indicator (significant deviations should be discussed with the mold technician).

3. Tool Offset Issues:

Causes:

  1. Inaccurate manual operation by the operator.
  2. Incorrect tool clamping.
  3. Errors in the fly cutter blade (the fly cutter itself has some inherent errors).
  4. Discrepancies between R-tool, flat-end tool, and fly cutter.

Improvements:

  1. Manual operations should be thoroughly checked, and the same point should be used for tool setting.
  2. Clean the tool holder with an air gun or wipe with a cloth before clamping.
  3. Measure the tool holder when using a fly cutter; for flat surfaces, use only one blade.
  4. Create a separate tool-setting program to avoid discrepancies between R-tools, flat tools, and fly cutters.

4. CNC Crash – Programming

Causes:

  1. Insufficient or missing safe height (during rapid feed G00, the tool or chuck collides with the workpiece).
  2. Mismatch between the tool specified in the program sheet and the actual tool in the program.
  3. Incorrect tool length (cutting edge length) on the program sheet versus the actual machining depth.
  4. Discrepancy between the Z-axis values in the program sheet and the actual Z-axis readings.
  5. Incorrect coordinate settings during programming.

Improvements:

  1. Accurately measure the workpiece height and ensure the safe height is above the workpiece.
  2. Ensure the tool specified in the program sheet matches the actual tool (preferably use automated program sheets or include images).
  3. Measure the actual machining depth on the workpiece and clearly note the tool length and cutting edge length on the program sheet (typically, the tool holder should be 2-3 mm higher than the workpiece, with a clearance of 0.5-1.0 mm for the cutting edge).
  4. Use the actual Z-axis reading from the workpiece and note it clearly in the program sheet (this is usually done manually and should be checked repeatedly).
  5. Ensure the correct coordinate settings are used during programming.

5. CNC Crash – Operator:

Causes:

  1. Incorrect Z-axis tool setting depth.
  2. Incorrect centering or data entry (e.g., failure to account for tool radius when measuring from one side).
  3. Using the wrong tool (e.g., using a D10 tool instead of a D4 tool).
  4. Running the wrong program (e.g., running A7.NC instead of A9.NC).
  5. Incorrect manual control direction on the handwheel.
  6. Wrong direction during manual rapid feed (e.g., pressing +X instead of -X).

Improvements:

  1. Pay attention to the tool setting depth for different positions (bottom, top, analyzed surface, etc.).
  2. Repeatedly check centering and data entry after completing these steps.
  3. When clamping the tool, double-check it against the program sheet before installation.
  4. Run programs one at a time in sequence.
  5. Operators should improve their machine operation skills for manual control.
  6. Raise the Z-axis above the workpiece before moving during manual rapid feed.

6. Curved Surface Precision:

Causes:

  1. Inappropriate cutting parameters, resulting in rough surfaces.
  2. Dull tool edges.
  3. Tool clamping is too long, or the cutting edge is too far from the workpiece.
  4. Poor chip removal, air blow, or coolant flow.
  5. Programming feed path issues (try to use climb milling where possible).
  6. Burrs on the workpiece.

Improvements:

  1. Set reasonable cutting parameters, tolerances, allowances, and feed rates.
  2. Operators should periodically check and replace tools as needed.
  3. The tool’s extension length should be minimized as much as possible while meeting machining requirements, to avoid excessive tool overhang.
  4. For flat tools, R-tools, and round-nose tools, set appropriate speeds and feed rates.
  5. Burrs on the workpiece: This is directly related to the machine, tool, and feed path. Therefore, understanding the machine’s performance is crucial, and additional passes may be needed to remove burrs from the edges.
Precision Manufacturing: The Role of Axes in CNC Machining


Precision manufacturing is the backbone of modern industries, where even the smallest deviation can lead to significant issues. One of the key factors that ensure accuracy in precision manufacturing is the role of axes in CNC machines. The correct alignment and movement along these axes directly impact the precision, speed, and efficiency of production processes. In this article, we will explore the importance of axes in CNC machining services and how they contribute to the overall success of precision manufacturing.

What Are Axes in CNC Machines?

In CNC machining, the term “axes” refers to the directions in which the cutting tools move to shape the material. Each axis represents a different plane of movement. The standard CNC machine operates with three axes: X, Y, and Z. More advanced machines can have up to five or even six axes, offering greater flexibility in manufacturing complex parts.

The Three-Axis CNC Machine

The most common type of CNC machine operates on three axes:

X-axis: Left to right movement.
Y-axis: Front to back movement.
Z-axis: Up and down movement.
These three axes allow for the basic shaping of parts but may struggle with intricate designs. For simpler parts, a three-axis machine often suffices, delivering reliable results in precision manufacturing.

The Five-Axis CNC Machine

For more complex tasks, five-axis CNC machines come into play. These machines add two additional axes:

A-axis: Rotates around the X-axis.
B-axis: Rotates around the Y-axis.
The added rotational axes allow for more intricate and detailed work, such as creating undercuts or complex geometries. Five-axis machines are especially crucial in industries like aerospace, automotive, and medical device manufacturing, where precision is paramount.

Why Axes Matter in Precision Manufacturing

The role of axes in CNC machining services cannot be overstated. The precision of each axis affects the overall quality of the manufactured part. Even a slight misalignment in one axis could lead to errors that compromise the entire production run. Below are some of the key reasons why axes are critical in precision manufacturing:

Improved Accuracy and Consistency

The more axes a CNC machine has, the more control it offers in shaping materials. With more control, errors are minimized, and precision is maximized. For industries where consistency is crucial, such as electronics or medical devices, the ability to produce identical parts repeatedly is essential.

Enhanced Efficiency

Machines with multiple axes can often complete tasks faster than those with fewer axes. This is because they can perform multiple cuts in different directions at the same time. The increased speed doesn’t just save time; it also reduces wear on the tools, prolonging their lifespan and making the process more cost-effective.

Versatility in Design

With the ability to move in multiple directions and rotate around different axes, CNC machines offer unparalleled flexibility in design. This allows manufacturers to create complex geometries that would be impossible or too time-consuming with traditional methods. In industries like aerospace, where complex parts are common, this versatility is a game-changer.

How Axes Influence CNC Machining Services

The number and type of axes in a CNC machine directly influence the kinds of services a manufacturer can offer. Here’s a closer look at how different axes contribute to CNC machining services:

Three-Axis Machining: For Simpler Parts

Three-axis CNC machining services are ideal for simpler parts that don’t require complex geometries. These services are often used in industries like furniture manufacturing, where precision is important but not necessarily to the level required in more high-tech fields.

Five-Axis Machining: For Complex Parts

Five-axis CNC machining services are critical for industries that require intricate designs and high precision. The additional axes allow for more complex cuts, reduced setup times, and fewer errors. For example, in the aerospace industry, five-axis machining is essential for producing parts with tight tolerances.

Multi-Axis Machining: For Ultimate Precision

Some industries require even more precision, achieved through multi-axis CNC machines. These machines can have up to six or seven axes, offering the highest level of precision and flexibility. Multi-axis machining is often used in specialized fields like medical device manufacturing, where tolerances can be as small as a few microns.

The Future of Precision Manufacturing and CNC Machines

As industries continue to evolve, so will the technologies behind precision manufacturing. The future of CNC machining services is likely to include even more advanced machines with greater control over multiple axes. These machines will not only improve accuracy but also enhance the speed and cost-effectiveness of manufacturing processes

Automation is another trend that will shape the future of precision manufacturing. By integrating advanced CNC machines with AI and machine learning, manufacturers will be able to achieve unprecedented levels of efficiency and precision. This shift will reduce human error and allow for even more complex designs to be manufactured with ease.

Conclusion: Axes Define Precision in CNC Machining Services

In conclusion, the role of axes in precision manufacturing is fundamental. Whether using a three-axis machine for simple tasks or a five-axis machine for more complex designs, the number of axes directly impacts the precision, efficiency, and versatility of CNC machining services. As industries demand higher levels of accuracy, the need for advanced machines with multiple axes will continue to grow.

For those seeking the highest levels of precision manufacturing, Bridgesea Hardware’s CNC Machining Service offers cutting-edge technology to meet all your needs. By utilizing advanced multi-axis machines, they ensure that your parts are manufactured with the utmost precision and accuracy.